Next: The Vertical Loop Up: The Lasso Previous: The Flat Loop
Please Read The Copyright Notice
Next: The Vertical Loop
Up: The Lasso
Previous: The Flat Loop
Many roping tricks and variations are based on the Flat Loop. The Flat Loop tricks presented in this section fall into four categories. The simplest Flat Loop tricks are those which consist of passing the loop around the body and those which depend on stepping or jumping in and out of the loop. Slightly more difficult but all the more gratifying are those tricks where the roper is standing inside the loop. Finally, the most difficult and the most impressive Flat Loop tricks are those which are based on lifts. If you learn all the tricks in this chapter you'll have plenty of tricks to make a little lasso routine!
Merry-Go-Round tricks are those that consist of passing a Flat Loop around the body. The Merry-Go-Round is begun by spinning a Flat Loop in front of the body. The Flat Loop is then passed to the side, around the back, to the other side, and then back to the front of the body thus completing the sequence. To begin, the basic Two-Handed Merry-Go-Round is described. This is followed by a description of the One-Handed Merry-Go-Round and a variation of the One-Handed Merry-Go-Round called the Neck Wrap.
For the Two-Handed Merry-Go-Round the roper starts by passing the Flat Loop from the right hand to the left hand. The left hand then moves the loop around the left side of the body and behind the back where the loop is passed back to the right hand. The right hand then moves the loop around the right side and to the front of the body thus completing the trick.
Mastering the Two-Handed Merry-Go-Round depends on learning three new skills with the Flat Loop: transfer of the Flat Loop from hand to hand, spinning a Flat Loop with the left hand, and moving the Flat Loop around to different positions of the body with either of the two hands. Moving the Flat Loop around the body and doing a Flat Loop with the left hand are usually not very difficult once the Flat Loop itself has been mastered. The most difficult aspect of the Two-Handed Merry-Go-Round are the transfers between hands (especially the one behind the back).
Figure 2.1 illustrates the transfer of the Flat Loop in front of the body from the right to the left hand.
The pass of the loop behind the back from the left to right hand is analogous to the pass in front of the body just described. The exchange must be timed so that it takes place when the honda is at 9 o'clock and the left hand is at 6 o'clock. It is at this position that the left hand is moving directly to the right on the hand circle path. Even though the passing technique behind the back is identical to that in front of the body, it is a bit more difficult to master. This is no surprise since there is no visual feedback and also you are likely to have more range of movement and be more dextrous when the hands are in front of the body. Nevertheless, the Two-Handed Merry-Go-Round is not a very difficult trick and you should be able to master this one in about the same amount of time that you spent on mastering the Flat Loop.
A couple points should be made here. The first point is that, as with the Flat Loop, it is necessary to continually untwist the spoke as described in Section 1.5. This will probably be a little uncomfortable in the left hand but be persevering. The second point is that the movement of the Flat Loop should require some application of the spin acceleration technique as described in Section 1.7. The spin acceleration required for the Merry-Go-Round is so slight, however, that you probably won't even have to make any conscious effort to apply it.
There are many Flat Loop tricks which are variations of the Merry-Go-Round. Obvious variations are tricks such as passing the Merry-Go-Round under the leg or doing the Merry-Go-Round in the opposite (clockwise) direction around the body. These sorts of variations don't need any special description and I leave it to the reader to experiment and discover some of the things that can be done with it. There are two variations, however, which are less obvious. One is called the One-Handed Merry-Go-Round and the other is called the Neck Wrap.
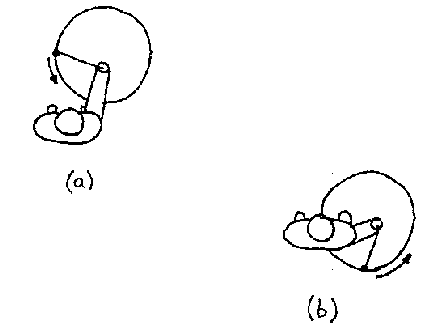
The One-Handed Merry-Go-Round, as the name implies, is done with just one hand. For this trick the right hand never passes the lasso to the left hand. Rather, it guides the lasso to the left and then around the back of the body with the right hand passing the spoke over the head and finally bringing the loop back out to the right hand side of the body.
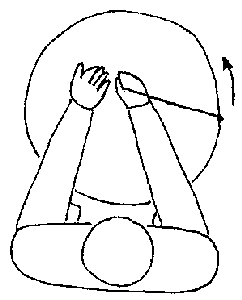
The neck wrap is like the One-Handed Merry-Go-Round, however, instead of passing the hand and spoke over the head the spoke is passed low enough to wrap about the neck.
As the hand approaches the left side of the body, the spoke begins to wrap around the back of the neck. As illustrated in Figure 2.3(a) this happens while the loop is passing behind the back. At the point shown in Figure 2.3(b) the right hand releases its hold on the spoke and the spoke and loop move freely through space. Nevertheless, during this short moment the spoke continues to contact the neck. After releasing the spoke, the right hand travels immediately back to the right side of the neck where it recatches the it as shown in Figure 2.3(c). The catch can also be made with the left hand. A regular Flat Loop is continued at this point.
Spoke jumping tricks are those where the roper repeatedly steps in and out of the spinning Flat Loop with one or both feet. This must be timed so that the roper's foot will not hinder the passage of the spoke.
The spoke jump with the right foot is illustrated in Figure 2.4. As illustrated in part (a) of the figure the jump is begun
The spoke jump is commonly called Crow Stepping . It can be performed continuously, repeatedly inserting and extracting the foot for each pass of the spoke. The foot exits the loop just long enough for the spoke to pass underneath. Repeated spoke jumping is a timing trick and the placement of the body weight is very important. The essential point is to shift the body weight back and forth between the left and right feet in rhythm with the passing of the spoke.
Many variations of the basic spoke jump are possible. Using the left foot instead of the right or interchanging the left and right feet one after the other are possibilities. Jumping in with both feet at once is a little more difficult.
When jumping into the Flat Loop with both feet there is no shifting of the body weight between a foot which is outside the loop and a foot which enters into the loop. Rather, each time the spoke comes around, the roper jumps straight up allowing the spoke to pass under both feet before they come back down into the loop. Here, it is important to always keep the end of the spoke close to the legs since any variation in the loop position will result in it touching the legs thus killing its spin.
Another variation of spoke jumping with both feet in the loop is to alternately lift one foot at a time. For this to work the spoke must be centered between the two legs so that the left foot is lifted when the spoke comes to 9 o'clock and the right foot is lifted when the spoke passes to 3 o'clock. This creates a trotting effect as the roper straddles the spoke back and forth on the left and right feet.
A very rewarding flat loop trick is the Wedding Ring. The first time I successfully spun a dozen turns of a Wedding Ring I was thrilled. The Wedding Ring is a flat loop that the roper stands in. As shown in Figure 2.5 the loop spins around the body while the spoke passes over the head.
Once the Wedding Ring is started it is similar to a regular Flat Loop. The quarter circle phase advance technique described in Section 1.4 must be respected and the hand must be relatively stationary with respect to the body. If the hand wanders around the loop will touch the body which will kill the spin and the trick will die. In fact most of the spinning with the right hand is accomplished by wrist action.
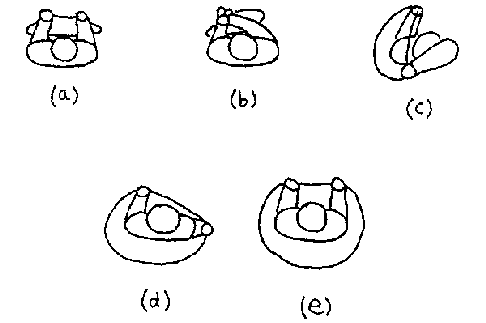
The most difficult part of the Wedding Ring is starting it. The starting configuration for the Wedding Ring is identical to that for the Flat Loop (refer to Figure 1.3). Going from the starting configuration to the Wedding Ring is accomplished as illustrated in Figure 2.6. First, note that while doing the Wedding Ring the body is in the interior of the rotating loop whereas for the starting configuration the body is exterior to the loop. Consequently, at a certain point an edge of the loop must be passed over the head and around the body. It is the right hand edge of the loop which is passed around the body.
As shown in the sequence (a)-(e) in Figure 2.6 this is done by moving the right hand from its starting configuration towards the left shoulder and then up over the head, around the back, and then towards the front of the body. During this entire motion both the left and right hands maintain their hold on the loop and spoke.
At the moment that the right hand reaches the front of the body both the left and right hands release the loop, the right hand maintains its hold on the spoke and spins the loop as in the Flat Loop only now with the hand just above the head. The turning motion that the hand gives to the loop once the hand is over the head is obtained by little more than wrist action. The hand should move as little as possible to avoid the loop moving from side to side and possibly touching the body.
The path that the right hand traces while beginning the Wedding Ring in Figure 2.6 is that of the circular path that the loop itself is going to travel in after it is released by the two hands. After the release the right hand spirals from the loop path to a point just above the head and close to the center of the loop. During the whole process, the left hand hardly moves except to release the loop at the moment that the right hand returns to the front of the body.
The Wedding Ring is a bit more difficult than the other tricks discussed so far, but it is also a much more gratifying. I am sure that you will get a kick out of it the first several times you succeed with it and I can't recommend too strongly that you try to master this trick.
There are a couple of other ways of beginning a Wedding Ring other than using the starting configuration just described. In each method the Wedding Ring is obtained from a regular Flat Loop. In the first method begin with a Flat Loop and then jump into the loop with both feet as if you were going to do some spoke-jumping. Instead of skipping the spoke lift the right hand up over the head to its usual position for the Wedding Ring. Since the spoke must not touch the body, the hand holding the spoke must be lifted from the position it had for the Flat Loop to its final position for the Wedding Ring in less than one complete turn of the loop.
This is a great trick which is usually warmly received by spectators of all types, two-legged or four. If you start up your Flat Loop, follow with a little Crow Stepping, pass the loop around the body a couple of times with some Two-Handed and One-Handed Merry-Go-Rounds and finish by jumping into the loop for a Wedding Ring you'll have a nice little routine. The little dogies will probably be so impressed they'll just lay right over and let you brand 'em without you havin' to chase and catch 'em!
A nice little variation of the Wedding Ring is obtained by lowering the right hand to waist level and passing the spoke around the waist from right hand to left in front of the body and from left to right behind the body as the loop is spinning. This is known as a Hand Shake Wedding Ring and it can be done continuously. An additional variation that I like a lot is had by alternately passing the spoke under the left and right legs each time the spoke comes around to the front of the body. Continuously performing this trick makes for a good little aerobic exercise.
A second method for beginning a Wedding Ring is to lift a flat loop over the head, allowing it to fall down around the body into the Wedding Ring. This is quite a bit more difficult than any of the other tricks already described in this book and at this point we're starting to get into some advanced trick roping. The method for doing a Flat Loop Lift is explained in the next section.
The Flat Loop Lift is a very dynamic flat loop trick. The method for lifting the loop is completely dependent on the spin acceleration technique described in Section 1.7 so you might want to go back and reread this section again while learning this trick.
The objective of the Flat Loop Lift (from now on simply called the Lift) is to lift the Flat Loop from its usual position to a new position which is over the head. In the process of doing the lift the spoke will pass from one side of the loop to the other and the entire upward motion of the loop will be accomplished in exactly one turn of the loop.
The spin acceleration technique described in Section 1.7 must be used for the lift since the strong upward pull on the Flat Loop will act to close the loop diminishing its diameter if nothing is done to counteract this. Also, the spin acceleration of the loop used to counteract the closing force of the upward pull on the spoke must be carefully coordinated so that the spoke is passed from above the loop to below it as the loop moves upward.
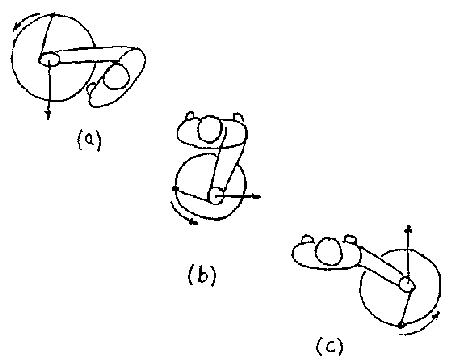
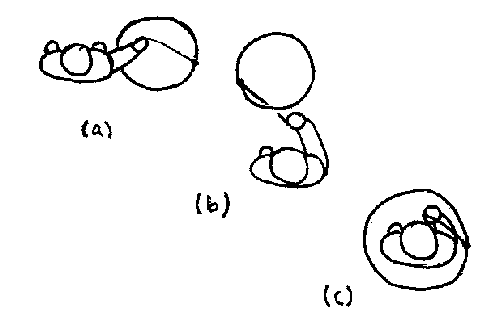
The exact sequence of actions needed to execute the lift are as follows. The lift is begun when the loop is at the right side of the body with the honda at 3 o'clock as shown in Figure 2.7(a). At this point
Thus, the loop goes from its usual Flat Loop position to about forehead height as the honda goes from 3 o'clock to 9 o'clock. The position in Figure 2.7(b) shows the spoke just after passing from above the loop to below. The hand is clearly shown outside of the perimeter of the loop, which, of course, is necessary to allow the loop to pass by the hand during its upward movement. The loop continues upwards until the spoke is fully extended and is directly overhead. At this point the honda should be at 3 o'clock as shown in Figure 2.7(c). Once the loop is overhead the most natural thing to do is to step under the loop and to allow it to fall down around the body into the Wedding Ring position.
A couple of observations are useful here. The first observation is that in order to lift the loop over the head in a single rotation of the honda requires a powerful pull on the spoke. This must be done, however, with an equally powerful acceleration of the loop's spin. If you look back for a moment at Figure 1.9(b), the illustrated increased diameter of the hand circle is not nearly sufficient for the Flat Loop Lift. In fact, I would say that for the Lift the position of the spoke is practically tangential to the circumference of the loop as the honda goes from 3 o'clock to 9 o'clock. The spin acceleration ends, of course, as soon as the spoke is no longer above the loop. Probably the most difficult aspect of mastering the Lift is the problem of maintaining an appropriate hand-honda phase advance while powering up the spin acceleration.
Many combinations of the Lift and the Wedding Ring are possible. You can jump into a Flat Loop and then lift the loop through the Wedding Ring and off the body, allowing the loop to fall back to a Flat Loop position. Alternately, you can lift the Flat Loop and let the loop fall down over the body, through the Wedding Ring position, down towards the feet and then jump out leaving the loop again, in the Flat Loop position. A very dynamic combination is to lift the Flat Loop, allowing the loop to fall into a Wedding Ring and then immediately lifting it back off to the Flat Loop position. When the lift is repeatedly dropped into the Wedding Ring and re-lifted off this trick is called the Body Bounce. The body bounce is similar in many ways to a Butterfly trick called the Arm Bounce described in Section 5.3.
 JPEG Image (50K)

 JPEG Image (31K)
Figure 2.9: But Carey Bunks Does a Wedding Ring Big Enough to Encircle the Eiffel Tower!