Next: Catches Up: The Lasso Previous: The Butterfly
Please Read The Copyright Notice
Next: Catches
Up: The Lasso
Previous: The Butterfly
The Butterfly is an important trick roping tool because it is the starting point for so many other tricks. This chapter describes some of the most important Butterfly variations and others can be found in [4], [8], and [12]. The objective of this chapter is not to be a compendium of the many tricks based on the Butterfly but, rather, to give a sampling of the most popular tricks while carefully describing, where appropriate, their underlying rational basis.
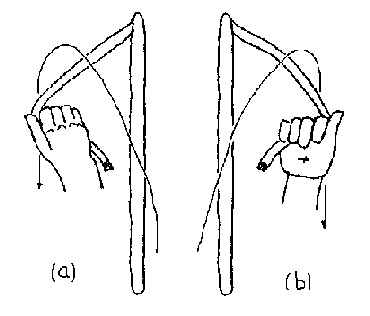
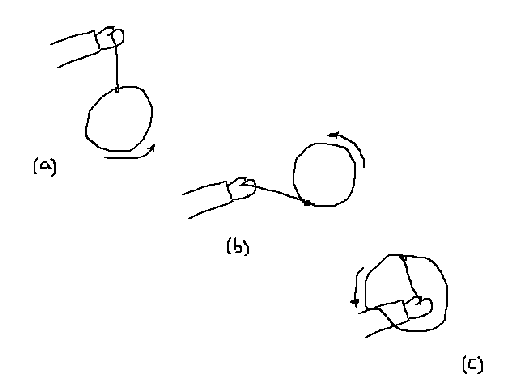
The first variation of the Butterfly that I'll discuss is the Zig-Zag. As described in Chapter 4 the Butterfly consists of four turns of the loop whereas, in contrast, the Zig-Zag is made up of just two. Another important difference is that the Zig-Zag is not pulled from side to side as is the Butterfly. The Zig-Zag remains stationary in front of the roper as the hand and the spoke flip-flop from one side of the loop to the other.
Figure 5.1 is a top view of the loop turning in the vertical plane. Also illustrated in this figure is the way that the hand and the spoke are used to impart spin to the Zig-Zag for each of the two turns. In Figure 5.1(a) the hand and the spoke are passing over the top of the loop from the right side to the left side. This passage occurs while the honda is between 3 o'clock and 9 o'clock in the upper half of the loop. During this passage the hand turns from palm up to palm down (look again carefully at both Figures 5.1(a) and (b)).
Figure 5.1(b) illustrates the passage of the hand from the left to the right side of the loop. As before, this happens by passing the hand and the spoke over the top of the loop while the honda is traveling in the upper half of the loop. During the passage from left to right the hand turns from palm down to palm up.
It is important to realize that the loop needs to be spin accelerated, not to counteract the force of a pull on the spoke, but rather to counteract the force of gravity. The novelty here is that the loop can only be accelerated while the honda is in the upper half of the loop since the hand does not have the time to follow the entire hand circle as for previously described tricks. Consequently, the hand must give a quick, snappy, spin acceleration to the loop during the passage of the hand and spoke from one side of the loop to the other. In between snaps of the wrist the hand remains stationary. That's to say that while the honda is in the lower half of the turn the tension on the spoke is relaxed. This is similar to the acceleration-relaxation cycle described for the Butterfly.
The Reverse Butterfly is identical to the normal Butterfly except that the loop is spinning in the opposite direction. Thus, on the left side of the body the loop turns in the counter-clockwise direction and on the right side of the body the loop turns in the clockwise direction. The explanations given in Chapter 4 should be sufficient to work out what needs to be done in order to master the Reverse Butterfly.
The feel of the Reverse Butterfly is very different from that of the Butterfly and learning one trick does not necessarily make learning the other any easier. Nevertheless, I strongly encourage you to work on the Reverse Butterfly since it is important for catches (see Chapter 6) and for the Arrowhead which will be described in what follows.
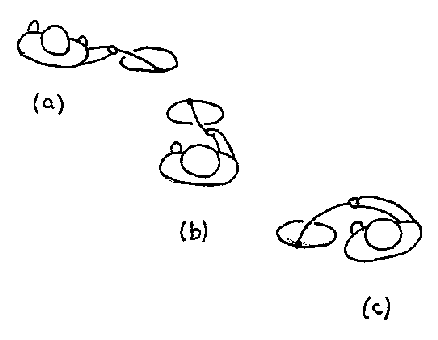
The Butterfly and the Reverse Butterfly can be used together to make many pretty combinations. One of these is called the Arrowhead. Figure 5.2 is a fake top view of the Arrowhead. It's a fake top view because the loop is turning in the vertical plane and, consequently, for a true top view the loop would not appear as an ellipse but as a line. In all three parts of the figure the loop is illustrated with the honda at the top of the loop.
The Arrowhead is the combination of a regular Butterfly passing from the front to the back of the roper on the right side with a Reverse Butterfly passing from the front to the back of the roper on the left side. Figure 5.2(a) and (b) illustrate the two positions of the loop corresponding to the regular Butterfly and Figures 5.2(b) and (c) illustrate those of the Reverse Butterfly. In all there are eight turns of the loop to make a complete Arrowhead sequence. The first turn is behind the roper on the right side followed by a turn to pass the loop to the front of the roper. The third turn is in front of the roper and then a turn is used to pass the loop behind the roper on the left side. The fifth turn is made behind the roper on the left side after which it is passed back to the front of the roper and where the seventh turn is made. The last turn is to pass the loop back behind the roper on the right side which completes the cycle.
The Arrowhead is a nice trick because it moves the loop around in a dynamic way. Once you've mastered the Arrowhead you can also try the Arrowhead in reverse. That's to say an Arrowhead which starts by doing a Reverse Butterfly on the right side of the roper followed by a regular Butterfly on the left side. Combinations of the Arrowhead with the reverse Arrowhead make for nice elements in a routine.
The Arm Bounce is one of my favorite tricks and it's a great crowd pleaser. The Arm Bounce sequence is illustrated in Figure 5.3. As shown in the figure the Arm Bounce consists of pulling the Butterfly loop down the length of the arm and then ``bouncing'' it off. As you might imagine the Arm Bounce is so called because the loop really seems to bounce as if it were attached to a spring. In fact the Arm Bounce loop is attached to a spring but it's a spring which is cleverly hidden in the angular momentum of the loop.
What does this mean? The best way to understand is to try a little experiment. Try doing a regular Butterfly and at the moment that the loop is pulled from left to right give it the most powerful spin acceleration you can. At the same time throw the Butterfly loop to the right as hard as you can without pulling it back to the left. What should happen is that the loop will travel to the right and then stop and ``bounce'' back without having been pulled. The loop does this because the spin acceleration you gave it makes the loop want to grow in diameter. When the loop gets far enough to the right to be at the end of the spoke the loop diameter continues to grow and in so doing shortens the length of the spoke. The fact that the spoke shortens pulls the loop back to the left suddenly and this gives the impression that the loop ``bounces'' back. If you give a pull back to the left at the same time as the bounce this effect is heightened.
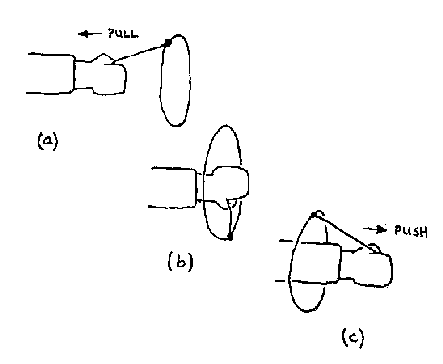
The arm bounce is begun from a Butterfly at the moment that the loop would normally be passed from one side of the body to the other (see Figure 5.3(a)). Instead of pulling the loop to the other side of the body, however, the loop is guided down the length of the right arm as shown in Figure 5.3(b). The loop is then bounced off the arm back to the position from which the Arm Bounce was started as shown in Figure 5.3(c).
Since the Arm Bounce is started at the moment when the Butterfly normally would be pulled from one side of the body to the other it follows that the action starts when the honda is at 12 o'clock. The loop travels down the length of the arm in one turn of the loop, and the loop is bounced off in one turn of the loop as well. The entire sequence thus requires exactly two turns of the loop.
From the previous discussion you have probably guessed that the secret to successfully performing the Arm Bounce is in the set-up and mastery of the spin acceleration. Let's assume that the Arm Bounce is to be performed on the right side of the body. To pull the loop down the length of the arm will require some spin acceleration to counteract the closing force exerted on the loop by the pull on the spoke. Unfortunately the position of the hand while the loop is traveling down the length of the arm makes it difficult to accelerate the spin of the loop. Thus, it is necessary to apply the spin acceleration before getting to the position illustrated in Figure 5.3(a).
The spin acceleration to be used during the Arm Bounce is applied before beginning the trick. Thus, as the Butterfly loop is being pulled from the left to the right side of the body a powerful spin acceleration is applied. At the same time the loop is pulled to the right more vigorously than usual. When the loop gets far enough to the right the extra spin acceleration makes it bounce back to the left which you accentuate by pulling the loop at the same moment. The loop is then guided down the length of the right arm. When the loop gets to the base of the arm push the loop back to the right. Since the loop still has a lot of spin acceleration the loop will seem to ``bounce'' back.
From the above description the loop actually bounces twice for a full Arm Bounce sequence: once from right to left as pictured in Figure 5.3(a) and once from left to right as pictured in Figure 5.3(b). Since the loop must travel down the extended right arm the Arm Bounce will be facilitated if you lift the Butterfly loop to shoulder height before beginning the pull down the arm.
The Arm Bounce can be performed on both the left and right sides of the body and this while performing either the regular or the Reverse Butterfly. For a right handed roper the right side of the body from a regular Butterfly is usually the easiest. The Arm Bounce can be repeatedly bounced on and off the arm, however, you'll have to learn how to renew the spin acceleration while doing the trick. Another point is that the Arm Bounce introduces twists in the spoke. These twists can be worked out by alternately performing Arm Bounces on one side of the body and then the other.
Up to this point all the tricks described in this book have required the spin acceleration to be applied at the same time as the pull on the spoke. This is so the loop closing force and the loop opening force balance each other. The Arm Bounce is the first trick where spin acceleration is developed in advance of the pull on the spoke and this in order to have a reserve of spin acceleration in order to make the loop ``bounce''.
The Arm Bounce is similar to the Body Bounce mentioned in Section 2.4. The only difference is that the Body Bounce is performed with the loop spinning in the horizontal plane and the Arm Bounce with the loop spinning in the vertical plane. The preceding comments concerning the spring effect of the Arm Bounce were not developed in the discussion of the Body Bounce but these ideas are equally valid for this trick.
Like the Arm Bounce, Rolls are well received by the general public. They are also amongst the hardest tricks to learn in this book. I devoted more time to learning the continuous Arm Roll than for any other lasso trick and since the trick gave me so much trouble I tried to attack the problem from a scientific point of view. I first used the Will Roger's film The Roping Fool [12] to project the trick onto a piece of paper, frame by frame. In this way I was able to trace out the exact trajectory of the Arm Roll as Will Rogers performed it. I was surprised to see that the Arm Roll flagrantly violated the quarter circle phase advance principle (see Figure 5.4). Furthermore, having seen how the trick progressed frame by frame didn't seem to help me learn it any faster.
I then spent a good part of the first 6 months of 1989 working on a computer model for the lasso. It was my hope that this model would help me to numerically simulate the complex interactions of the loop and spoke forces during the Arm Roll which would allow me to determine the correct spin acceleration. During this time I didn't quite learn how to do the Arm Roll but I did learn a lot about numerical modeling of nonlinear mechanical systems as well as about the theory of optimal control.
In the end I never did obtain a complete computer solution to the Arm Roll problem (this didn't stop me from learning the trick!). However, what I learned about optimal control theory during this period became a very important part of my subsequent career since soon afterwards I began working on problems of seismic inversion and earth imaging and I was able to apply many of the notions that I learned from my previous ``work'' on the lasso. Who would have thought that having played with a shoelace at the age of four would have had such a distant and unpredictable effect on my professional career?
Figure 5.4 can be used to give a general description of the Roll. The effect of the trick is that the loop of the lasso physically rolls up the spoke and over a part of the body. The figure illustrates a roll over the back of the arm and clearly shows how the loop rolls up the spoke. What might seem surprising here is the position of the loop with respect to the spoke as illustrated in part (a) of this figure.
Rolls, like all other Butterfly tricks, depend on an appropriate application of the spin acceleration technique as described in Section 1.7. To achieve the position shown in Figure 5.4 the Roll requires a spin acceleration in advance of when it is actually used to balance the pull on the spoke. In this regard the Roll is similar to the Arm Bounce the difference being that with the Arm Bounce the spin acceleration is balanced by a pull on the spoke perpendicular to the loop plane (pulling the loop down and off the arm), whereas, for the Roll the spin acceleration is balanced by a pull on the spoke in the loop plane (pulling the loop up the spoke).
The Arm Roll will serve as a paradigm for explaining the principles of all rolls described in this section. The technical details of the Arm Roll are valid for all the other rolls except, of course, for the position of the body over which the roll rolls.
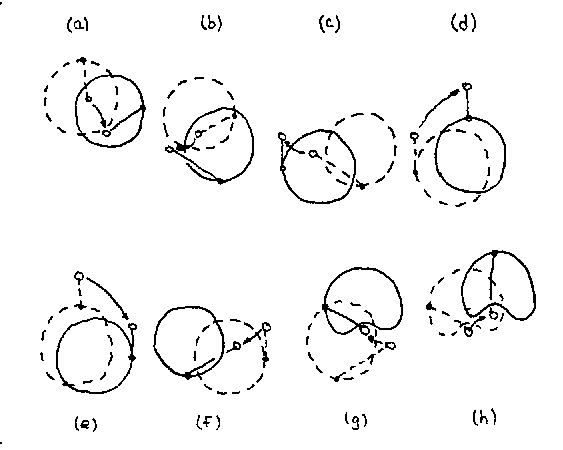
The Arm Roll is begun from a Butterfly just after the loop finishes its turn on the left side of the roper. Instead of pulling the loop from left to right, as normal for the Butterfly, the roper turns to the left to face the loop and the loop is pulled downwards and layed out as illustrated in the sequence shown in Figure 5.5(a)-(d). If the loop has been pulled downwards with enough force it will then roll up the spoke pretty much all by itself. The trick is in guiding the loop so that it rolls up over the arm.
An entire Arm Roll sequence consists of exactly two turns of the loop. Figure 5.5 parts (a)-(d) illustrate the loop, honda, and hand paths for the first turn of the loop. The dotted loop, spoke, hand, and honda in Figure 5.5(a) illustrate the moment that the Arm Roll is begun. That's to say the moment at the end of the left hand turn of the Butterfly when the loop is to be pulled downward. The solid loop in Figure 5.5(a) illustrates the loop a quarter turn later than the dotted loop. Note that the honda has gone from 12 o'clock to 3 o'clock and that the hand and the loop have both moved quite a bit in the downwards direction. At this point, the hand still obeys the quarter circle phase advance principle with respect to the honda.
In Figure 5.5(b) the dotted loop is identical to the solid loop in Figure 5.5(a), and the solid loop in Figure 5.5(b) is a quarter turn later in the trick. Here, the hand and the loop are both quite a bit lower than they were in the previous stage due to the downward pull on the spoke. The hand is still a quarter circle ahead of the honda and at this point the spin acceleration of the loop should be increasing.
Figure 5.5(c) illustrates the point of the sequence where the spin acceleration is maximum. Once again the solid loop is a quarter spin ahead of the dotted loop and the hand still obeys the quarter circle phase advance, however, now the hand circle is outside of the loop circle. The hand and loop are still traveling downwards at this stage.
The fourth stage of the first turn of the loop shows it completely layed out as is illustrated in part (d) of the figure. At this point the loop has made a single complete turn from the position illustrated in Figure 5.5(a). Note that the hand pulls up sharply on the spoke at this point and so the hand and the loop are illustrated as being higher than in the previous parts of the figure.
An important point in this first turn of the Arm Roll sequence is that the spoke is on the near side of the loop. That's to say the spoke is on the same side of the loop as the roper. For the second turn of the sequence, however, the spoke must be on the opposite side of the loop from the roper. This part of the sequence is illustrated in Figure 5.5(e)-(h).
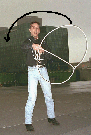
Figure 5.5(e)-(h) illustrate the second half of the Arm Roll sequence. This part is where the loop rolls up and over the arm. This is a tricky part of the Arm Roll. During the entire second turn of the loop the hand must adjust its position and pull so that the loop will move up and over the arm. Note that for this part of the sequence that the hand does not obey the quarter circle phase advance principle. The hand is actually behind the phase of the honda in this turn of the loop. It is the powerful spin acceleration given to the loop in the first half of the sequence which makes up for this in the second half. Also note that the hand and arm are lowered somewhat to facilitate the loop rolling over the arm and that the loop may deform as it makes contact with the arm. Figure 5.6 illustrates the Arm Roll at the point where it is rolling up the spoke and over the arm. The arrow drawn on the figure shows the direction of motion of the loop. This photo corresponds to a position about midway between Figures 5.5(e) and (f).
 GIF Image (96K)
Except for the fact that the spoke is on the far side of the loop and positioned on top of the arm the position in Figure 5.5(h) is similar to that in Figure 5.5(a). This means that the Arm Roll can be repeated at this point. Alternatively, the loop can be allowed to roll off the arm and caught back into a regular Butterfly.
The arm roll can also be done on the right side of the body. To do a right side Arm Roll the instructions given in the preceding description are reversed. That is, the loop is now pulled downward after the turn of the Butterfly loop on the right side of the roper. The loop is then pulled down and up in the same way as before. The difference is that the loop must now roll over the back of the right arm (as is illustrated in Figure 5.4) which is due to the direction of turn of the loop on this side of the body.
In the Arm Roll the roper turns to face the loop so that the arm will be perpendicular to the plane of spin of the loop. This gives the loop a base to roll over. Shoulder Rolls are similar to Arm Rolls where instead of rolling over the arm, the loop rolls over the shoulder. Since the shoulders are already perpendicular to the plane of spin of the Butterfly it is not necessary to turn the body before beginning this roll. To begin the Shoulder Roll the loop is pulled downward and backward so that the loop can then roll up over the shoulder from behind. The roll can be made over the left or right shoulder from either the left or right side. I personally find that Cross Shoulder Rolls are the more esthetic. These are the rolls which come over the shoulder on the opposite side from where the roll began.
A Head Roll is a variation of the Shoulder Roll where the loop comes up from behind and rolls over the top of the head. This creates a nice comical effect. The Head Roll requires some precision to make it roll in the right place and can be made somewhat easier if you wear a hat.
The Neck Roll is another one of my favorites. The Neck Roll is just like the Arm Roll except that the loop rolls across the shoulders and over the back of the neck instead of rolling over the arm. When first learning this trick you'll probably want to lean over slightly so that the loop will have a nice broad base to roll on. After you've mastered it, though, the loop can be guided across the shoulders from left to right without having to lean at all.
The Leg Roll is quite a novelty trick. The effect of the Leg Roll is that the roper throws a Butterfly loop under the leg only to have it pop back up and roll over it. To perform the Leg Roll you'll need to prepare the spoke so that it won't be wrapped around your leg at the end of the trick. Here's how it's done.
As the Butterfly loop is being passed from the left to right side of the body the left foot steps over the part of the spoke between the left and right hands. At this point the spoke should be running from the left hand (now behind the legs), through the legs, to the right hand, and finally to the loop.
After the left foot steps over the spoke the Butterfly loop does a normal turn on the right side of the body before being passed back to the left side. A turn is then made on the left side of the roper as in the preparation for an Arm Roll. At the same time the roper turns to the left (as for the Arm Roll). As the loop is pulled downwards the roper lifts up the left leg and the loop is directed under it so that when the loop begins to roll up the spoke it comes up from behind and over the left leg.
During the roll over the leg the right hand, which is now underneath and on the left side of the left leg, releases the spoke, comes out from under the leg, and recatches the spoke on the right side of the left leg. The release and recatch of the spoke is the trickiest part of the Leg Roll. It is this part of the trick which is essential for disentangling the spoke from between the two legs.
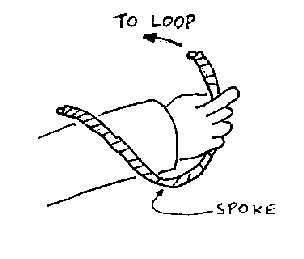
The Spoke Roll, like the Leg Roll, needs a setup for the spoke before beginning the trick. The setup up for this roll requires that the spoke be wrapped once around the wrist as shown in Figure 5.7.
The wrap on the wrist is accomplished while performing the Butterfly. As the loop is being pulled from the right to the left side the right hand releases and passes underneath the spoke recatching it with the spoke now wrapped once around the wrist. For the right hand to successfully release and recatch the spoke the hand will have to move to the left faster than the spoke. This may seem a little tricky at first but you shouldn't have too much trouble with it.
Once the wrap of the spoke around the wrist has been accomplished the Spoke Roll may be begun. This roll is started at the point where the Butterfly loop is normally passed from the right to the left side of the roper. During this turn of the loop the loop is directed in the downward direction as in the sequence illustrated in Figure 5.5(a)-(e).
The sequence illustrated in Figure 5.5(a)-(e) is the part of the roll which gives enough spin acceleration so that the loop can be pulled up and over a part of the body. However, you don't have to roll the loop over a part of the body. You can simple lift the loop high over the head which makes for a pretty lasso trick all by itself. By positioning the downward throw of the loop behind the body you can then lift the Butterfly loop so it floats over the top of the head or the shoulder. This trick can be begun from either the left or right sides of the body.
The Ocean Wave is like the Butterfly except that one of the side-to-side passes of the loop is made behind the roper instead of in front. Between the normal and the Reverse Butterflys there are four possible Ocean Waves. For the normal Butterfly the pass of the loop behind the roper can be made from the left to the right side or from the right to the left side. This accounts for two of the Ocean Waves. The other two come from the Reverse Butterfly.
For right handed ropers the most important Ocean Wave is the one that is based on the Reverse Butterfly spin where the loop passes behind the roper from left to right. This is the most useful Ocean Wave for making catches (see Chapter 6). This is the Ocean Wave that I describe in the following. All the other Ocean Waves are easily worked out variations of what is discussed here.
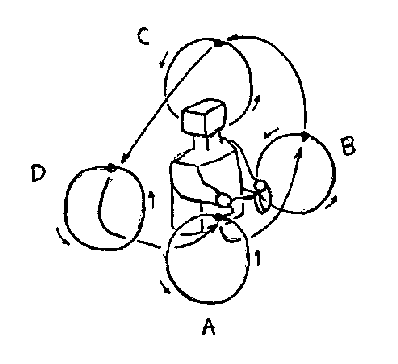
Figure 5.9 illustrates the four turns of the Ocean Wave. As indicated by the small arrows the direction of turn of the loop is that for the Reverse Butterfly. The large arrows show how the loop moves in relation to the position of the roper. The turn labeled ``A'' in the figure indicates the position of the loop at the end of its turn on the right hand side of the roper. The turn labeled ``B'' is the position of the loop after the passage from the right to the left. The turn labeled ``C'' is the position after the turn of the loop on the left side and the turn labeled ``D'' is that after the passage of the loop, behind the roper, from the left to the right.
From the preceding description it is clear that the Ocean Wave differs from the Reverse Butterfly by the passage of the loop behind the back. There is an important point, however, that needs to be further developed. Note that the position of the loop labeled ``C'' is behind the roper. This means that after the pull of the loop from the right to the left the loop must then be pulled from the front to the back. The loop labeled ``C'' in the figure is also elevated with respect to the loop labeled ``B''. Clearly the backward and upward pull on the spoke needed to move the loop from position ``B'' to position ``C'' requires spin acceleration. The movement of the loop between the positions labeled ``D'' and ``A'' also requires spin acceleration, however, not as much as that for the one just discussed.
Thus the Ocean Wave differs from the Reverse Butterfly in three points. First, the loop passes behind the roper for the pass of the loop from left to right. Second, for all four turns of the loop the roper must apply spin acceleration whereas spin acceleration is only required for two turns of the Reverse Butterfly. Third, there is an up and down movement of the loop for the Ocean Wave due to the lift of the loop over the left shoulder. This motion recalls the up and down swelling of waves at the ocean which is, apparently, the origin of this trick's name (see [2] and [4]).
A common problem with the Ocean Wave is that the loop tends to incline at a 45 degree angle while the loop is passing back and forth around the body. This problem can be diminished by making sure that the Ocean Wave loop is sufficiently lifted over the shoulder in the turn labeled ``C'' of Figure 5.9.
 JPEG Image (37K)